The Polycom VVX250 is a business IP phone that offers a range of features for effective communication.
Here are basic instructions on how to use the Polycom VVX 250:
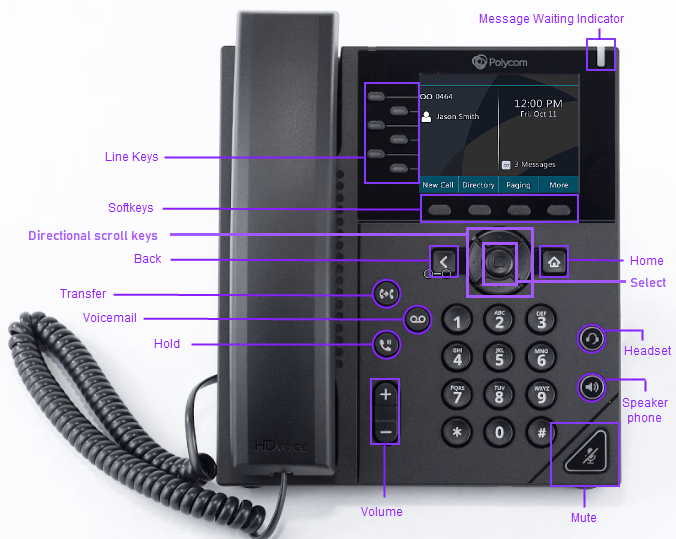
The Basics
- Powering On:
- Connect the Polycom VVX 250 to a power source using the provided power adapter.
- The phone will start up, and the Polycom logo will appear on the screen.
- Network Connection:
- Connect the phone to your network using an Ethernet cable. Ensure that the network connection is active.
- Making Calls:
- To make a call, pick up the handset and dial the desired number using the keypad.
- Alternatively, you can use the speakerphone or a connected headset for hands-free calling.
- Answering Calls:
- When a call comes in, you can answer it by lifting the handset, pressing the “Speaker” button for speakerphone mode, or using a connected headset.
- Ending Calls:
- To end a call, simply hang up the handset, press the “End Call” soft key, or replace the handset if you were using it.
- Adjusting Volume:
- During a call, use the volume control buttons on the phone to adjust the speaker and handset volume to a comfortable level.
- Muting Calls:
- If you need to mute your microphone during a call, press the “Mute” button. The button will light up to indicate that your microphone is muted.
Still the basics
- Voicemail:
- To access voicemail, press the “Messages” button on the phone. Follow the prompts to retrieve and manage your voicemail messages.
- Navigation:
- The Polycom VVX 250 has a navigation button and soft keys for easy menu navigation. Use the arrow keys to move through menus and select options.
- Contacts:
- You can save contacts in the phone’s directory for quick and easy access. Use the phone’s menu to add, edit, or delete contacts.
- Conference Calls:
- To set up a conference call, initiate a call with the first participant, press the “Conference” soft key, dial the second participant, and then press “Conference” again to merge the calls.
- Settings:
- Customize your phone settings by accessing the settings menu. You can adjust display settings, ring tones, and other preferences.
- Updating Firmware:
- Check for firmware updates periodically to ensure your phone has the latest features and security patches. You can usually update the firmware through the phone’s web interface.
- Troubleshooting:
- If you encounter any issues, refer to the user manual for troubleshooting tips or contact your IT department for assistance.
Always refer to the specific user manual for your Polycom VVX 250 model for detailed instructions and additional features.
Transferring a call on the VVX 250 involves a few simple steps.
Here’s a guide on how to transfer a call:
Blind Transfer:
A blind transfer involves transferring a call without speaking to the recipient first.
- During an active call, locate the “Transfer” soft key on the phone’s display.
- Press the “Transfer” soft key. This action usually places the current call on hold.
- Dial the number to which you want to transfer the call. You can use the keypad to enter the number or select a contact from the directory.
- Press the “Transfer” soft key again to complete the transfer. The call is now transferred to the specified number.
Attended Transfer:
An attended transfer allows you to speak to the recipient before completing the transfer.
- During an active call, locate the “Transfer” soft key on the phone’s display.
- Press the “Transfer” soft key. This action usually places the current call on hold.
- Dial the number to which you want to transfer the call. You can use the keypad to enter the number or select a contact from the directory.
- Wait for the recipient to answer. If they are available and willing to take the call, you can inform them about the transfer.
- To complete the transfer, press the “Transfer” soft key again. If the recipient is unavailable or declines the call, you can press the “Cancel” or “End Call” soft key to return to the original call.
These steps may slightly vary depending on the specific configuration of your Polycom VVX 250 and the phone system it’s connected to. If you encounter any difficulties or if your phone has been configured differently, it’s recommended to refer to the user manual provided with your specific Polycom VVX 250 model or consult with your IT department for assistance.
Adding and deleting contacts on the VVX250 involves using the phone’s menu and directory features.
Here are step-by-step instructions for adding and deleting contacts:
Adding Contacts:
- Access the Menu:
- Press the “Home” button on the Polycom VVX 250 to access the main menu.
- Navigate to the Directory:
- Use the arrow keys to navigate to the “Directory” option in the menu.
- Select “Add Contact”:
- Once in the Directory, select the “Add Contact” option. This may be listed as an option in the menu, or you may need to press the corresponding soft key.
- Enter Contact Information:
- Enter the contact’s information using the phone’s keypad. This typically includes the name, phone number, and any additional details.
- Save the Contact:
- After entering the information, look for a “Save” or “Done” option on the screen. Select it to save the new contact.
- Verify the Contact:
- To ensure that the contact has been added successfully, navigate back to the Directory and check for the new entry.
Deleting Contacts:
- Access the Menu:
- Press the “Home” button to access the main menu.
- Navigate to the Directory:
- Use the arrow keys to navigate to the “Directory” option in the menu.
- Select “Contacts” or “View Contacts”:
- Once in the Directory, select an option like “Contacts” or “View Contacts” to see the list of saved contacts.
- Locate the Contact:
- Use the arrow keys to navigate to the contact you want to delete.
- Select “Delete” or “Remove”:
- Once the desired contact is highlighted, look for an option like “Delete” or “Remove.” Press the corresponding soft key.
- Confirm Deletion:
- The phone may ask you to confirm the deletion. Confirm by selecting “Yes” or a similar option.
- Verify Deletion:
- Navigate back to the Directory or Contacts list to verify that the contact has been successfully deleted.
These steps provide a general guide, and the exact process may vary slightly based on the specific model and configuration of your Polycom VVX 250. If you encounter any difficulties or if your phone has been configured differently, consult the user manual provided with your specific model or seek assistance from your IT department.
Also, the voicemail feature has been activated on each handset so voicemails will be left on the appropriate handsets.
To access and listen to the voicemail messages, please follow these instructions:
- Press the Voicemail “envelope” button on your handset (as circled in red below)
- Enter the relevant mailbox ID below, followed by the # key :Handset 1001 mailbox ID code: ??????
Handset 1002 mailbox ID code: ??????
- Then press 1 to access the mailbox and follow prompts to play, save, replay, delete messages etc.